
or
Richard and the Terrible, Horrible, No Good, Very Bad Aircraft Kit
My apologies to Alexander and his creator Judith Viorst.
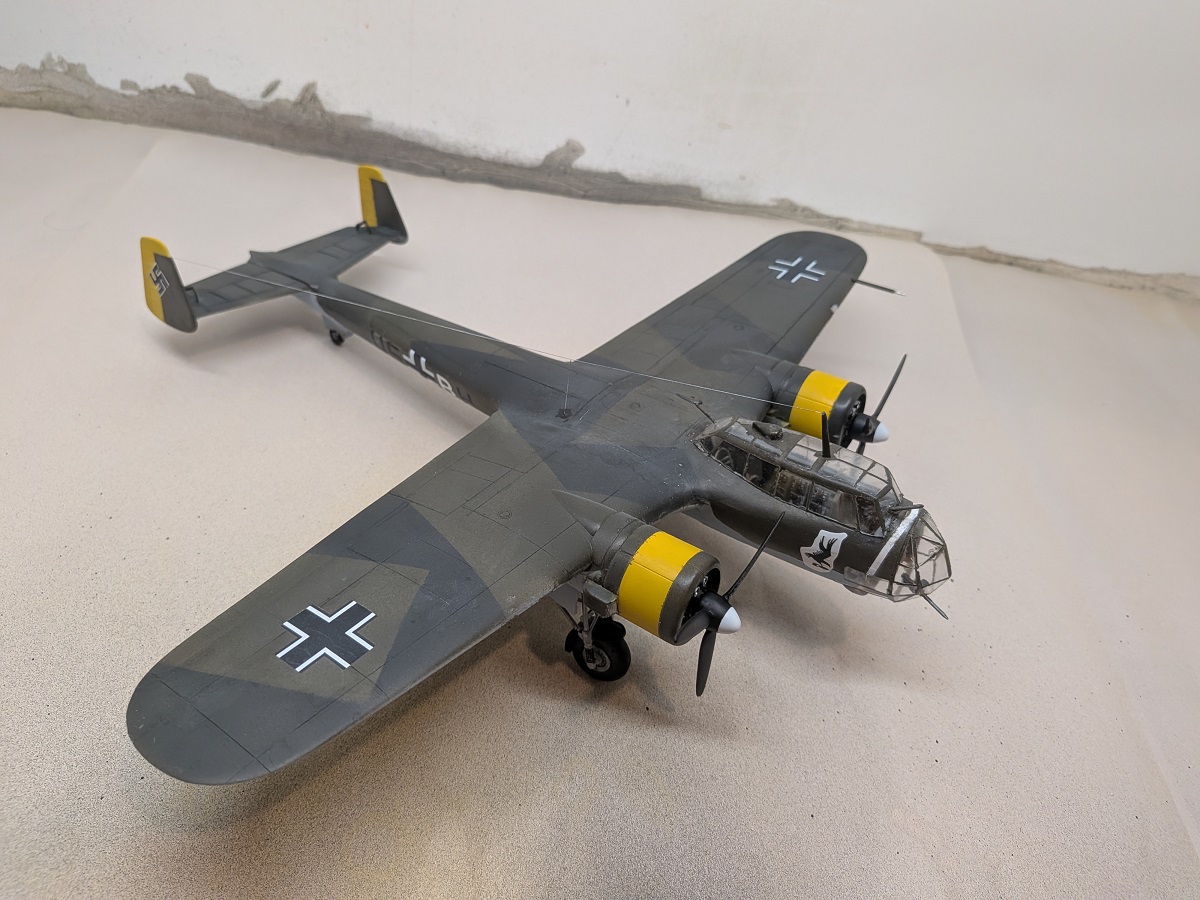
Let’s start with the instructions. As you can see, the instructions are three pages of simple exploded view with vague arrows pointing in a general direction. For some reason, my instructions didn’t include illustrations of profiles and color call-outs or decal locations. I downloaded these from Scalemates. Studying my references from Kagero Publishing, it’s clear the model has only a quarter to a third of the aircraft’s panel lines. Since I can’t draw a straight line with a ruler, scribing the missing lines was only moderately successful.

There are almost no locator pins, and none in the interior, so positioning of cockpit details is by approximation. Speaking of, the cockpit is bare. I added Kits-World 3-D decals meant for the I.C.M. model.
There are lots of inaccuracies in this kit. Staying with the cockpit for a moment, in the Do-17, the pilot is seated on the port side, the bombardier on starboard; Hobbycraft has the bombardier under the pilot. Correcting this meant getting the vac-formed sets from Squadron. Once the fuselage is joined, a section of the nose has to be cut off and replaced. This not only corrects the bombardier position, but also replaces the very thick clear pieces for the cockpit. There are no mask sets available for these Squadron pieces, you have to create your own. This was my first time working with vac-form replacements like this, so faring it in with the polystyrene was, again, moderately successful.

The engines are fairly nice, but they’re the wrong ones for this version of Do-17! Ah, well. The cowls need work. First, they’re molded with cowl flaps; the Do-17 doesn’t have them. In addition, the air intakes are in the wrong positions. For one, it was merely a matter of rotating the cowl for the proper orientation. For the other, it meant cutting the smaller intake and swapping it with a section of cowl in the correct location.

Interestingly, the fuselage is split horizontally, rather than vertically. The fit is actually pretty good, needing no filler and minimal clean-up. The same is true for the wings. Attaching the wings to the fuselage was a different matter. The leading edge at the root didn’t match up well with the fuselage and needed putty to blend in the joint.
The camouflage pattern is RLM 65, 70 and 71. I used AK Air AK2003, 2005 and 2006 from the AK Air Luftwaffe Camouflage set, AK 2001. For the theater designator, I used MRP RLM 04 (MRP-051). I used poster putty to separate lower and upper paint. Unfortunately, I was obviously heavier on the RLM 70 and 71 than I realized. The result, when I removed the poster putty, was several places with pronounced ridges of paint. Trying to mask around the intakes on the cowl to match my profile proved very awkward; I would have been better off to remove the cowls and paint them separately. Again, ah, well.
After the paint came the decals. The kit’s sheet is actually pretty extensive, representing several different aircraft, if you only knew what aircraft they were! Fortunately, my Kagero reference shows U5+BH stationed in Totoi, Greece, May 1941. The decals actually performed well.

With that done, it was time to attach the final pieces of the exterior.
As with the cockpit, the undercarriage leaves a lot to be desired. You can’t correctly align the wheels on the main gear axles. The wheel wells have no detail, and there are no clear locators for the strut assembly. A couple of notches on the front wall of the well apparently indicate where the main strut connects, but it doesn’t actually attach to the notches, so you have to hold the strut in place while you glue it in position. The braces coming off the strut just seem to stick behind somewhere. To my surprise, the gear stay in place when I set the model on the table, but I wouldn’t trust I could move it around, like taking it to a competition, without major disaster.
Finally, with E-Z Line painted silver for the antenna wire and the props given black and white spinners, done!

This project took almost five months from start to finish, often because I was getting frustrated and delayed before getting back to it. I wouldn’t say, “Don’t buy this kit.” I would say there are probably better options for this aircraft out there. If you’re going to take it on, you’ll need better skills than I have for a good, clean result.
The moral of this story: We do our best as we build. Hopefully, the current project will turn out better than the last. That doesn’t always happen. So, finish the best you can, try to learn from the process, and move on! The objectives of the hobby are things like learning, enjoyment and developing skills, not perfection. Maybe the next one will turn out better. I’m hoping….


Leave a Reply